• We are STAs
    • Asha Rountree
    • Haley Ma
    • Kate Shih
    • Kyra Lee
    • Nicholas Peasley
    • Sasha Kenney
    • Shanda Horm
    • Shriya Atreya
    • Tomas Marulanda-Mesa
  • We were STAs
  • STA Presentation
    • STA Presentation 2017
    • STA Presentation 2016
  • Testimonials
  • Resources
  • Home

STA Blog

Good to be Back

August 21, 2023 By Marissa Devivar

Back in the Design Lab!

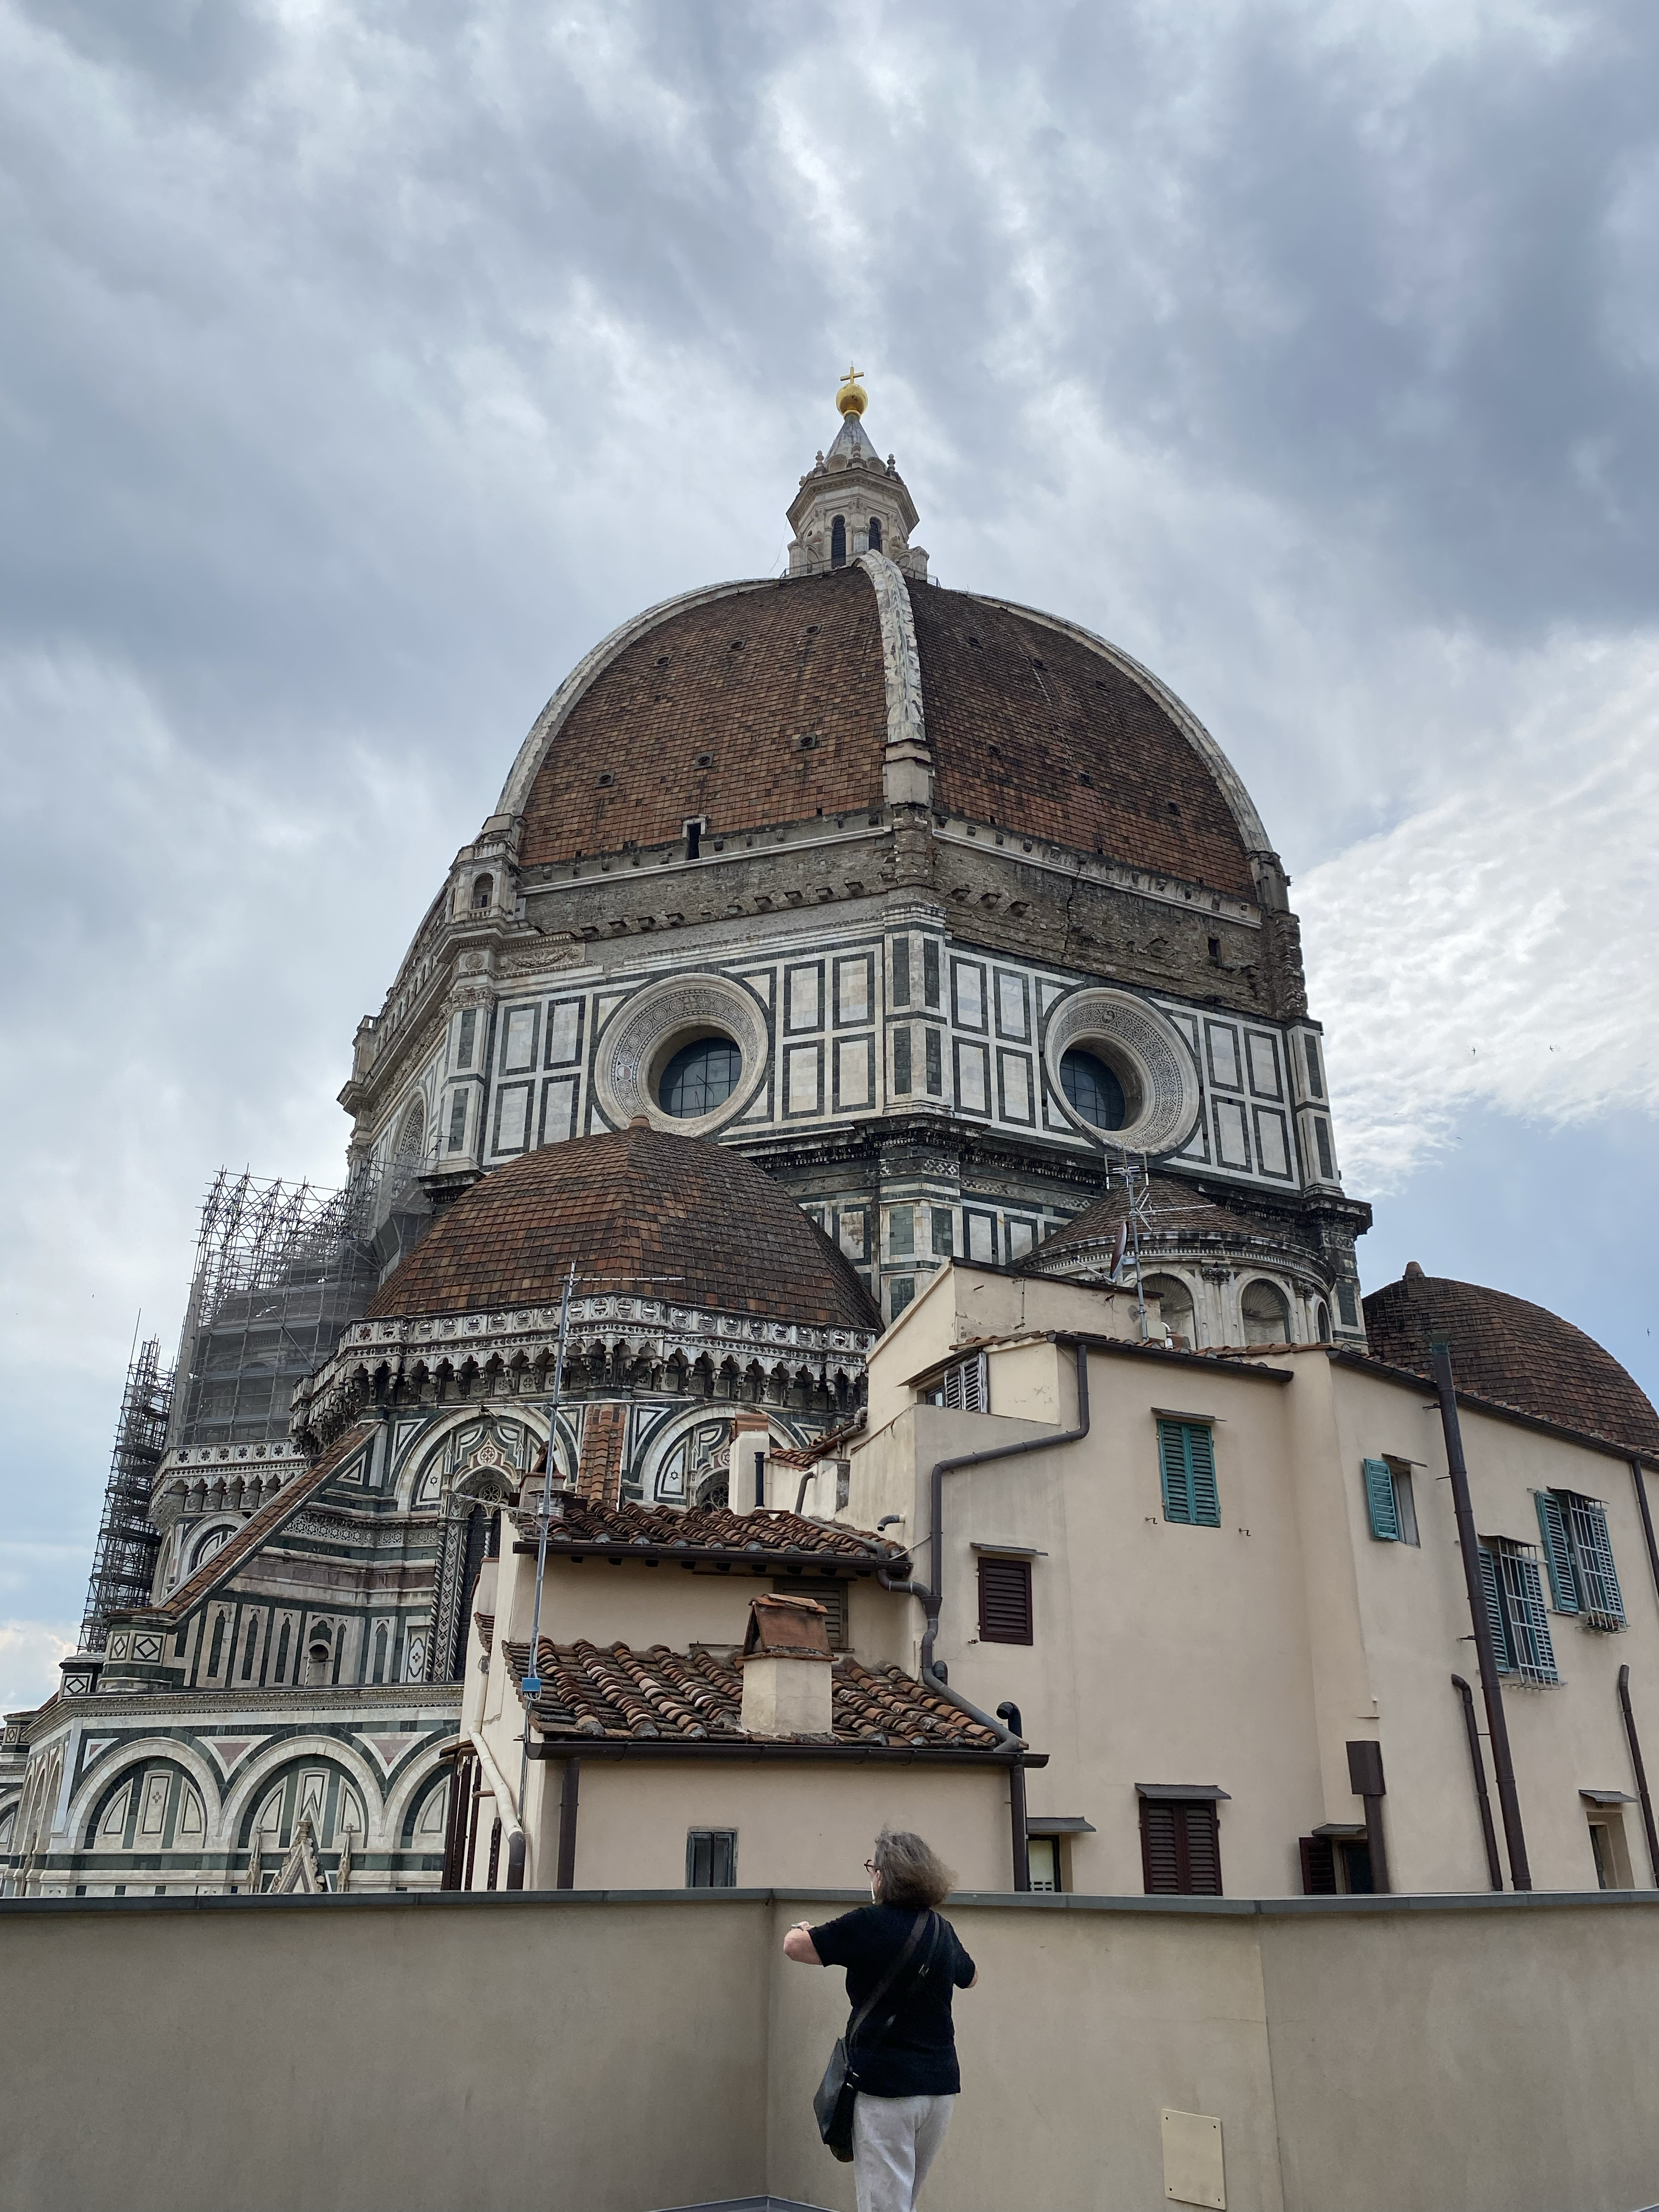
I am back from my summer break and ready to get back into designing:) I was lucky enough to study abroad this summer in Italy through UT’s Learning Tuscany program. This was my first time going outside of the Americas, so there was definitely a bit of culture and language shock. My Professor Ann Johns was very knowledgeable about Italian culture though, so my classmates and I felt more at ease when we were with her. I have SO many photos so here are a few from the places I visited and some of the art I made!


I’m excited to be back as a Design STA, especially because I’ll be taking a graphic design course this semester, which will help me become more familiar and creative with Adobe programs.

Filed Under: Fall 2023 - Spring 2024, We are STAs

My First Post!

August 21, 2023 By Adriana Hermoza

Hi y’all! I am very excited to have my first day/week as a Design STA! I am transferring from the Project Management Team where I worked with an awesome team to ensure all the projects are completed without a hitch. I am looking forward to meeting all my new coworkers and working along side y’all! As well as get more experienced in illustrator, photoshop, and Adobe in general!


This is what I’ve worked on so far for my first week!

STA Self-Portrait

Start: August 22, 2023

Completed by: August 24, 2023

I haven’t drawn a person in a long time, so this assignment though a bit challenging, was very entertaining. Whenever I draw or paint a person I like to play around with shades, textures, and the different colors I can use. So with that said, the part that I enjoyed the most was painting the clothes and hair. Drawing clothing with shades, made me happy as I was getting back into drawing. I also chose this specific clothing because I find it to be the outfit that I usually wear the most.

STA Banner

Start: August 21, 2023

Completed by: August 22, 2023

I have always been into painting flowers, specifically roses, so I took my past paintings of them and then used them to create my banner. I thought it really went with my aesthetic so arranged in them in the center and to make them pop, I made the background black and added a some texture. For the font, I decided to go with a cursive font and different colors for my name and major.


Here is what I worked on my first day:

STA Handbook PPT

Start: August 21, 2023

Completed By: August 21, 2023

I started off the orientation by designing a powerpoint of 5 rules from the handbook. I decided I wanted cool, soft tone colors for my background so I went with blue and purple. Here’s is my work:


Filed Under: Fall 2023 - Spring 2024, We are STAs

Welcome to the STA Blog

August 15, 2023 By Princeton Tran

Hi Princeton! 🙂 Welcome to the STA Blog! This the page where your blog posts will published.

Toward the end of your STA Orientation, you’ll design and upload a banner to go at the top of this page.

Upload a Blog Banner


Step One: Design Your Banner in Photoshop

Use these Photoshop specs when you’re making your banner:

    • Your banner should be 780 pixels wide (the height doesn’t matter)
    • Must include your name, your major, and your expected graduation year
    • Your banner should reflect who you are (your personality, interests or major)
    • Make sure to save your banner for the web (i.e. File > Export > Save for Web (Legacy))
    • If you save your banner as a JPG, make sure sure the quality is high (i.e. at least 60)

Step Two: Save Your Banner

  • There are two places you can save your completed projects: UT Box and the LAITS server. You’ll be given a personal folder in both locations. For now, you only have to save your banner to UT Box, but you may have to access the server at some point in the future.

Accessing UT Box

    • If you haven’t already registered with Duo, follow the instructions here to set up an account.
    • Then log in to UT Box with your EID and password: http://utexas.box.com/
    • Go to the folder called Design-Coding-STAs, then the subfolder STA-folders
    • Find the folder with your name on it
    • Save your banner both as an image and an unmerged PSD

Accessing the LAITS server

    • Accessing the LAITS server from off-campus is slightly more complicated.
    • You’ll need to be registered with Duo if you aren’t already (you can register here).
    • Then you’ll need to connect to the UT VPN and the LAITS server. The videos below will walk you through how to do that:
      • Connect to the Server – PC
      • Connect to the Server – Mac
    •  Then navigate to your STA volume folder and save
      • smb://file.laits.utexas.edu/sta/Princeton Tran
    • Save your banner both as an image and an unmerged PSD

Step Three: Upload Your Banner to the STA Blog

  • Log in the the STA Blog here. You should’ve received an email confirming your new WordPress account with your username and assigned password. If didn’t get it or you can’t log in, ask Suloni or another STA.
  • You’ll be able to change your password anytime by going to Users > Your Profile > Account Management > New Password.

Uploading media and banners in WP

  • Read these links before you upload your banner.
  • They will walk you through how to upload media to your blog.

How to Upload a Homepage Banner

Adding New Posts and Media

Make Your First Blog post


  • Reflect on the day. You blog posts will be a documented experience of your time as an STA with LAITS. They can include anything you want to share about the projects you’re working on, and the more media (screenshots, images, links, videos, gifs) you can use, the better.
  • For today, write a bit about about yourself and what you did during orientation.
  • If you haven’t already, upload your banner.

Things to Remember


Image Specs

  • You should never copy and paste images intoto your blog. Always upload images into the media section of blog first (Click on the add media button), then insert the image from the media folder to display on your blog.
  • Don’t use the thumbnail version of your images.
  • Use images that are 72 dpi
  • Screenshots are fine
  • Images that are 780 pix wide format nicely above or below text blocks

Always Categorize Your Posts

  • Always check the category “Fall 2023 – Spring 2024” on the blog posts you make this summer. This is the only category you need to check.
  • Make sure your posts are categorized correctly so that all of your work is documented in the correct semesters.

Commenting on Basecamp

Notification comments: etiquette, files, questions, feedback

Let us know when you’ve completed this task by adding a link to your blog to a comment in Basecamp.
Notes for all comments in Basecamp:
  • *Always address the person/people you are writing to by their names.
  • *Always use complete sentences.
  • *Always add links or paths to your design file in your STA folder.
  • *Make it easier for your collaborators and mentors to give you feedback on a design by adding screenshots to your comment.


Notify people in Basecamp by adding the @ symbol before their names (no spaces), otherwise they may not see your comment.

@ your STA mentor in your comments when you want to:

  • ask us questions about the mechanics of using the STA blog,
  • about the mechanics of photoshop,
  • to let us know that you have completed this task,
  • or that you would like a little feedback on on your banner design 🙂

Thank you & have fun!

Filed Under: Fall 2023 - Spring 2024

Welcome to the STA Blog

August 15, 2023 By Adriana Hermoza

Hi Adriana! 🙂 Welcome to the STA Blog! This the page where your blog posts will published.

Toward the end of your STA Orientation, you’ll design and upload a banner to go at the top of this page.

Upload a Blog Banner


Step One: Design Your Banner in Photoshop

Use these Photoshop specs when you’re making your banner:

    • Your banner should be 780 pixels wide (the height doesn’t matter)
    • Must include your name, your major, and your expected graduation year
    • Your banner should reflect who you are (your personality, interests or major)
    • Make sure to save your banner for the web (i.e. File > Export > Save for Web (Legacy))
    • If you save your banner as a JPG, make sure sure the quality is high (i.e. at least 60)

Step Two: Save Your Banner

  • There are two places you can save your completed projects: UT Box and the LAITS server. You’ll be given a personal folder in both locations. For now, you only have to save your banner to UT Box, but you may have to access the server at some point in the future.

Accessing UT Box

    • If you haven’t already registered with Duo, follow the instructions here to set up an account.
    • Then log in to UT Box with your EID and password: http://utexas.box.com/
    • Go to the folder called Design-Coding-STAs, then the subfolder STA-folders
    • Find the folder with your name on it
    • Save your banner both as an image and an unmerged PSD

Accessing the LAITS server

    • Accessing the LAITS server from off-campus is slightly more complicated.
    • You’ll need to be registered with Duo if you aren’t already (you can register here).
    • Then you’ll need to connect to the UT VPN and the LAITS server. The videos below will walk you through how to do that:
      • Connect to the Server – PC
      • Connect to the Server – Mac
    •  Then navigate to your STA volume folder and save
      • smb://file.laits.utexas.edu/sta/Adriana Hermoza
    • Save your banner both as an image and an unmerged PSD

Step Three: Upload Your Banner to the STA Blog

  • Log in the the STA Blog here. You should’ve received an email confirming your new WordPress account with your username and assigned password. If didn’t get it or you can’t log in, ask Suloni or another STA.
  • You’ll be able to change your password anytime by going to Users > Your Profile > Account Management > New Password.

Uploading media and banners in WP

  • Read these links before you upload your banner.
  • They will walk you through how to upload media to your blog.

How to Upload a Homepage Banner

Adding New Posts and Media

Make Your First Blog post


  • Reflect on the day. You blog posts will be a documented experience of your time as an STA with LAITS. They can include anything you want to share about the projects you’re working on, and the more media (screenshots, images, links, videos, gifs) you can use, the better.
  • For today, write a bit about about yourself and what you did during orientation.
  • If you haven’t already, upload your banner.

Things to Remember


Image Specs

  • You should never copy and paste images intoto your blog. Always upload images into the media section of blog first (Click on the add media button), then insert the image from the media folder to display on your blog.
  • Don’t use the thumbnail version of your images.
  • Use images that are 72 dpi
  • Screenshots are fine
  • Images that are 780 pix wide format nicely above or below text blocks

Always Categorize Your Posts

  • Always check the category “Fall 2023 – Spring 2024” on the blog posts you make this summer. This is the only category you need to check.
  • Make sure your posts are categorized correctly so that all of your work is documented in the correct semesters.

Commenting on Basecamp

Notification comments: etiquette, files, questions, feedback

Let us know when you’ve completed this task by adding a link to your blog to a comment in Basecamp.
Notes for all comments in Basecamp:
  • *Always address the person/people you are writing to by their names.
  • *Always use complete sentences.
  • *Always add links or paths to your design file in your STA folder.
  • *Make it easier for your collaborators and mentors to give you feedback on a design by adding screenshots to your comment.


Notify people in Basecamp by adding the @ symbol before their names (no spaces), otherwise they may not see your comment.

@ your STA mentor in your comments when you want to:

  • ask us questions about the mechanics of using the STA blog,
  • about the mechanics of photoshop,
  • to let us know that you have completed this task,
  • or that you would like a little feedback on on your banner design 🙂

Thank you & have fun!

Filed Under: Fall 2023 - Spring 2024

Welcome to the STA Blog

August 15, 2023 By Lila Mali

Hi Lila! 🙂 Welcome to the STA Blog! This the page where your blog posts will published.

Toward the end of your STA Orientation, you’ll design and upload a banner to go at the top of this page.

Upload a Blog Banner


Step One: Design Your Banner in Photoshop

Use these Photoshop specs when you’re making your banner:

    • Your banner should be 780 pixels wide (the height doesn’t matter)
    • Must include your name, your major, and your expected graduation year
    • Your banner should reflect who you are (your personality, interests or major)
    • Make sure to save your banner for the web (i.e. File > Export > Save for Web (Legacy))
    • If you save your banner as a JPG, make sure sure the quality is high (i.e. at least 60)

Step Two: Save Your Banner

  • There are two places you can save your completed projects: UT Box and the LAITS server. You’ll be given a personal folder in both locations. For now, you only have to save your banner to UT Box, but you may have to access the server at some point in the future.

Accessing UT Box

    • If you haven’t already registered with Duo, follow the instructions here to set up an account.
    • Then log in to UT Box with your EID and password: http://utexas.box.com/
    • Go to the folder called Design-Coding-STAs, then the subfolder STA-folders
    • Find the folder with your name on it
    • Save your banner both as an image and an unmerged PSD

Accessing the LAITS server

    • Accessing the LAITS server from off-campus is slightly more complicated.
    • You’ll need to be registered with Duo if you aren’t already (you can register here).
    • Then you’ll need to connect to the UT VPN and the LAITS server. The videos below will walk you through how to do that:
      • Connect to the Server – PC
      • Connect to the Server – Mac
    •  Then navigate to your STA volume folder and save
      • smb://file.laits.utexas.edu/sta/Lila Mali
    • Save your banner both as an image and an unmerged PSD

Step Three: Upload Your Banner to the STA Blog

  • Log in the the STA Blog here. You should’ve received an email confirming your new WordPress account with your username and assigned password. If didn’t get it or you can’t log in, ask Suloni or another STA.
  • You’ll be able to change your password anytime by going to Users > Your Profile > Account Management > New Password.

Uploading media and banners in WP

  • Read these links before you upload your banner.
  • They will walk you through how to upload media to your blog.

How to Upload a Homepage Banner

Adding New Posts and Media

Make Your First Blog post


  • Reflect on the day. You blog posts will be a documented experience of your time as an STA with LAITS. They can include anything you want to share about the projects you’re working on, and the more media (screenshots, images, links, videos, gifs) you can use, the better.
  • For today, write a bit about about yourself and what you did during orientation.
  • If you haven’t already, upload your banner.

Things to Remember


Image Specs

  • You should never copy and paste images intoto your blog. Always upload images into the media section of blog first (Click on the add media button), then insert the image from the media folder to display on your blog.
  • Don’t use the thumbnail version of your images.
  • Use images that are 72 dpi
  • Screenshots are fine
  • Images that are 780 pix wide format nicely above or below text blocks

Always Categorize Your Posts

  • Always check the category “Fall 2023 – Spring 2024” on the blog posts you make this summer. This is the only category you need to check.
  • Make sure your posts are categorized correctly so that all of your work is documented in the correct semesters.

Commenting on Basecamp

Notification comments: etiquette, files, questions, feedback

Let us know when you’ve completed this task by adding a link to your blog to a comment in Basecamp.
Notes for all comments in Basecamp:
  • *Always address the person/people you are writing to by their names.
  • *Always use complete sentences.
  • *Always add links or paths to your design file in your STA folder.
  • *Make it easier for your collaborators and mentors to give you feedback on a design by adding screenshots to your comment.


Notify people in Basecamp by adding the @ symbol before their names (no spaces), otherwise they may not see your comment.

@ your STA mentor in your comments when you want to:

  • ask us questions about the mechanics of using the STA blog,
  • about the mechanics of photoshop,
  • to let us know that you have completed this task,
  • or that you would like a little feedback on on your banner design 🙂

Thank you & have fun!

Filed Under: Fall 2023 - Spring 2024

  • « Previous Page
  • 1
  • …
  • 26
  • 27
  • 28

link to LAITS home page

Video STA Home

© 2025 Liberal Arts Instructional Technology Services | Production Credits