• We are STAs
    • Asha Rountree
    • Haley Ma
    • Kate Shih
    • Kyra Lee
    • Nicholas Peasley
    • Sasha Kenney
    • Shanda Horm
    • Shriya Atreya
    • Tomas Marulanda-Mesa
  • We were STAs
  • STA Presentation
    • STA Presentation 2017
    • STA Presentation 2016
  • Testimonials
  • Resources
  • Home

STA Blog

AI Logo Training

January 20, 2021 By Poonum Mehta

This week I picked back up on a logo training I was working on before winter break in Illustrator. I wanted to create something I could use on my food blog (shameless plug chefpnut.com). I started our with a simple chef’s hat design:

Angie noted that having the wordmark within the logo would impede my ability to scale the design smaller and larger. She also pointed out that because my design is very line-based, color options were limited. I adjusted accordingly, making the utensils larger to create spaces for color blocks, and moving the wordmark below the logo. I also changed the font because new year new me. Here are the three vaiations of the logos: one black and white, one full logo, and one with initials for the wordmark.

I then positioned these logos onto some merchandise, and positioned those mockups onto a webpage:


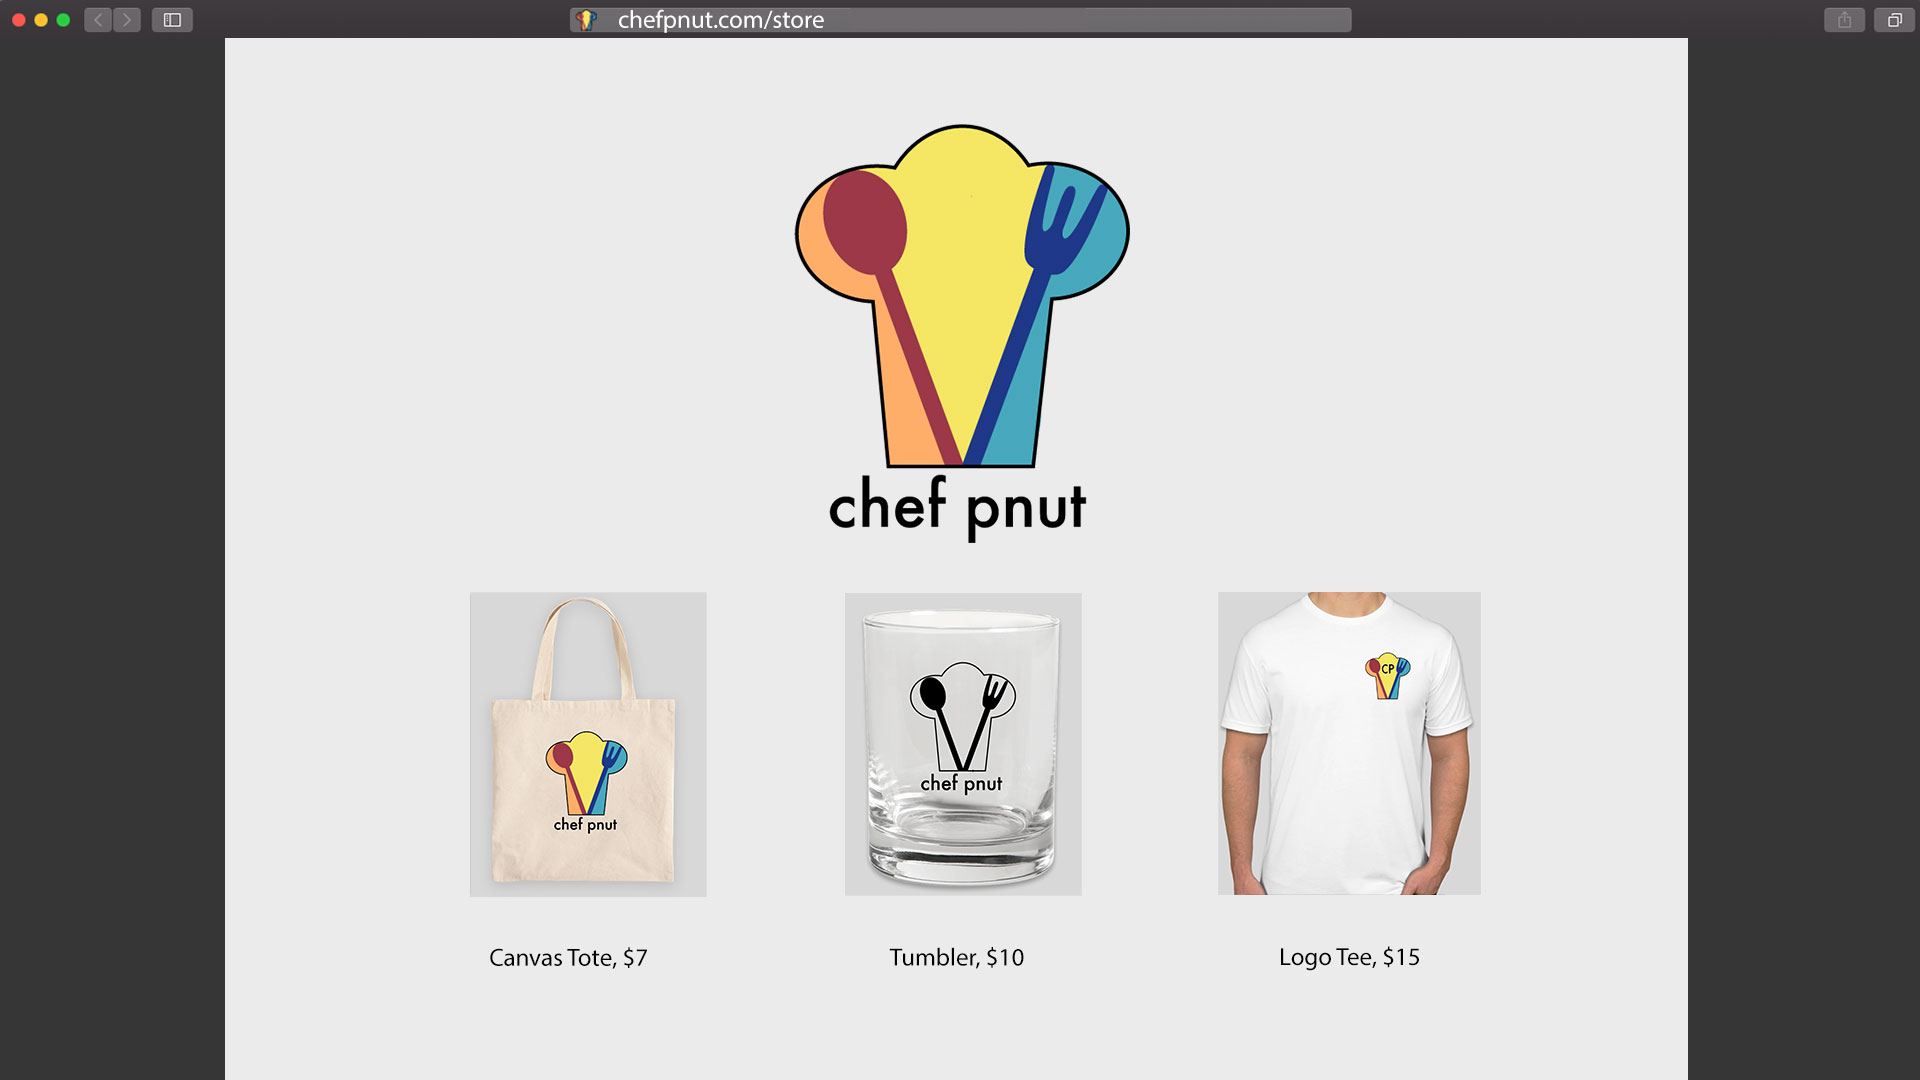
This training was pretty fun! Logo creation requires more attention to detail than I thought, as you really need to make sure the design is adjustable for products of varying sizes and shapes. I sometimes feel like I’m in a rut with the way I tackle creative design projects, but maybe this is just my style? I really love line work and creating line work, and I always steer towards primary color blocks. Some self-reflection is in order, me thinks. I’m hoping to rebrand my cooking blog soon so once that’s done I’ll post an update here of the logo ~in action~ hehe


Filed Under: 2021 Spring - 2021 Summer, We are STAs

Hi Relena!

January 20, 2021 By Relena Lai

Welcome to the STA Blog! This the page where your blog posts will published.
Toward the end of your STA Orientation, you’ll design and upload a banner to go at the top of this page.

Upload a Blog Banner


Step One: Design Your Banner in Photoshop

Use these Photoshop specs when you’re making your banner:

    • Your banner should be 780 pixels wide (the height doesn’t matter)
    • Must include your name, your major, and your expected graduation year
    • Your banner should reflect who you are (your personality, interests or major)
    • Make sure to save your banner for the web (i.e. File > Export > Save for Web (Legacy))
    • If you save your banner as a JPG, make sure sure the quality is high (i.e. at least 60)

Step Two: Save Your Banner

  • There are two places you can save your completed projects: UT Box and the LAITS server. You’ll be given a personal folder in both locations. For now, you only have to save your banner to UT Box, but you may have to access the server at some point in the future.

Accessing UT Box

    • If you haven’t already registered with Duo, follow the instructions here to set up an account.
    • Then log in to UT Box with your EID and password: http://utexas.box.com/
    • Go to the folder called Design-Coding-STAs, then the subfolder STA-folders
    • Find the folder with your name on it
    • Save your banner both as an image and an unmerged PSD

Accessing the LAITS server

    • Accessing the LAITS server from off-campus is slightly more complicated.
    • You’ll need to be registered with Duo if you aren’t already (you can register here).
    • Then you’ll need to connect to the UT VPN and the LAITS server. The videos below will walk you through how to do that:
      • Connect to the Server – PC
      • Connect to the Server – Mac
    •  Then navigate to your STA volume folder and save
      • smb://file.laits.utexas.edu/sta/Ingrid Alberding
    • Save your banner both as an image and an unmerged PSD

Step Three: Upload Your Banner to the STA Blog

  • Log in the the STA Blog here. You should’ve received an email confirming your new WordPress account with your username and assigned password. If didn’t get it or you can’t log in, ask Suloni or another STA.
  • You’ll be able to change your password anytime by going to Users > Your Profile > Account Management > New Password.

Uploading media and banners in WP

  • Read these links before you upload your banner.
  • They will walk you through how to upload media to your blog.

How to Upload a Homepage Banner

Adding New Posts and Media


Make Your First Blog post


  • Reflect on the day. You blog posts will be a documented experience of your time as an STA with LAITS. They can include anything you want to share about the projects you’re working on, and the more media (screenshots, images, links, videos, gifs) you can use, the better.
  • For today, write a bit about about yourself and what you did during orientation.
  • If you haven’t already, upload your banner.

Things to Remember


Image Specs

  • You should never copy and paste images intoto your blog. Always upload images into the media section of blog first (Click on the add media button), then insert the image from the media folder to display on your blog.
  • Don’t use the thumbnail version of your images.
  • Use images that are 72 dpi
  • Screenshots are fine
  • Images that are 780 pix wide format nicely above or below text blocks

**Always Categorize Your Posts

  • Always check the category “2019 Fall-Winter | Spring-Summer 2020” on the blog posts you make this summer. This is the only category you need to check.
  • Make sure your posts are categorized correctly so that all of your work is documented in the correct semesters.

Commenting on Basecamp

Notification comments: etiquette, files, questions, feedback

Let us know when you’ve completed this task by adding a link to your blog to a comment in Basecamp.
Notes for all comments in Basecamp:
  • *Always address the person/people you are writing to by their names.
  • *Always use complete sentences.
  • *Always add links or paths to your design file in your STA folder.
  • *Make it easier for your collaborators and mentors to give you feedback on a design by adding screenshots to your comment.


Notify people in Basecamp by adding the @ symbol before their names (no spaces), otherwise they may not see your comment.

@ your STA mentor and Suloni in your comments when you want to:

  • ask us questions about the mechanics of using the STA blog,
  • about the mechanics of photoshop,
  • to let us know that you have completed this task,
  • or that you would like a little feedback on on your banner design 🙂

Thank you & have fun!

Filed Under: 2021 Spring - 2021 Summer, We are STAs

PSD Cutout

January 14, 2021 By Abriella Corker

PSD Cutout

This training was a little different because it focuses on making sure you are able to get fuzz, blurred, and complex edges when you are trying to isolate the object from its background. I picked photos with different levels of difficulty and tried different methods of isolating the object.

Filed Under: 2021 Spring - 2021 Summer, We are STAs

January 14, 2021 By Ingrid Alberding

This week, I really focused on HIS 315K powerpoints, creating drafts and uploading final versions, looking over STAs’ drafts, and doling out the assignments while keeping the spreadsheet updated. Below I have linked an example of one powerpoint I did.


HIS315K-Politics1850s-LAITS20

https://sta.laits.utexas.edu/blog/2021/01/14/more-ppts/

Filed Under: 2021 Spring - 2021 Summer, We are STAs

Completing the Wellness Video

January 13, 2021 By Athena Zeng

Completing the Wellness Video

Hello again! A lot has happened since the last time I posted: winter break, coming back to work, and the rest of the wellness (and study tips) videos!

Asset Completion

I think where I last left off, I was in the final stages of tracing the wellness assets. From that point, I also colored in the assets based on the style guide Poonum created, with leeway for shading. The “look” we were going for was that kind of sketchy type of illustration where it’s not perfectly colored in. I learned a lot about illustrating with tablets and making use of different layers and the keyboard shortcuts to do coloring efficiently. This happened right before break, and I wrapped the coloring up the day we came back from break (January 4).


Animation

When the final assets were done, I uploaded them to box and got started on the animating. After Effects is a hefty program with a lot of buttons and my laptop was not prepared for it. Luckily, my brother let me use his computer for a few days (Thank You). I imported the asset photoshop files and got to work doing the different animations. This was a pretty tedious process that involved a lot of small changes to composition time, animation timing, and asset creation/tweaking as needed. Since we had already planned out what layers we needed for the animations to work , Angie and I split up the work based on the five scenes that needed to be created. I read through the wellness scripts to get an understanding of what actions needed to happen and when, then applied the earlier brainstorming on effects that could be used to execute the actions. This process involved a lot of learning as I went and looking up YouTube video tutorials. I mostly used the position, rotation, and opacity tools to adjust keyframes, but I also used the wiggle() expression to get some of the plant “shivering”. Something I learned you could do was use the panning tool to adjust the anchor point of assets, such that rotation would make the asset rotate from a different point. Due to deadline pressure, it wasn’t too feasible for me to learn a bunch of new, fancy effects. But I feel way more comfortable using After Effects now, and I definitely want to explore further. Here is a screenshot of what working on After Effects looked like.

When we were satisfied with a scene, we got feedback usually by rendering and uploading an mp4 file. Then we collected the dependencies and sent them to Poonum, who put all our compositions together on Premier Pro. This is a step that is necessary when collaborating on After Effects files with different people. Part of the challenge was figuring out how to do all the remote collaboration, and this process also got pretty tedious at times. The animation process took us two work weeks. It was so impressive to see it all come together. Poonum mentioned working together to create a KB for remote project/After Effects collaboration, which is a great idea.


The videos will be available for viewing on a Canvas module, so I also did a quick mockup of a way to display the resources. This would require some more effort and learning from the coding side though!


Final Reflection

The videos are done! I think! We wrapped up today. For me, the most important takeaways probably center around remote collaboration and also the topic of learning new things.

Remote collaboration was a big challenge throughout this whole process. This is something that has been pertinent throughout all of my projects at LAITS, as I often find myself wishing I was around other people to get those quick questions answered or to watch how other people do things. But it was applicable here on a new scale, as we had to figure out how to designate roles and split up tasks for a large project. The project puzzle pieces coming together was the best part of this project, for me.

In regards to learning new things, this whole project involved a lot of it. We pretty much created everything from scratch, other than the audio. To see it go from an idea, to sketches, to storyboarding, to assets, to animation, to a compiled video was such an amazing thing! It required a lot of question-asking, Googling, and guessing and checking. If someone had asked me to do this on my own, prior to working as an STA, I honestly would have been so frazzled and probably given up. But having everyone to bounce off of and the expectation that something would actually be completed by a deadline was a nice reminder that things can be done even if they are scary LOL. I am so proud of our team! Hopefully it all works out.

On a personal note, I decided to stop watching Naruto Shippuden and finish the original series first, which was so necessary. After watching too much Naruto over the break and skipping some filler, I have now returned back to Shippuden. I keep harping on Naruto because I previously held a strong loathing for anime, so this is actually very intense character development for me. One of the best parts about Naruto is the music. I particularly like Gaara’s Childhood Theme and this song. Thank you for reading hehe. Have a great last weekend before school officially starts again!

Filed Under: 2021 Spring - 2021 Summer, We are STAs

AFR Course Graphic

January 11, 2021 By De'sha Bass-McClellan

AFR Course Graphic

I’m currently still working on the AFR course graphic. The first design I create was kinda spontaneous, but I learn from that design to create something that would be blocked by the professor.

I wanted to go with a grid or collage for the graphic, but the grid that was created was still missing something with the design.


I decided to go with a collage and bring more character the the layout of the images.

Once I created the basic structure of the graphic, I was able to incorporate different design elements in black and white and sepia.

We decided to go with the sepia color and have the images more spread apart. In addition, we added a textured overlay with the map design in the background. I also edited the pictures to look older than their original format.

With some additional changes to the graphic, such as the change in location of the pioneer woman and MLK. I was able to create the final design for the course graphic.


For the desk skirt and vertical monitor I had to make similar changes to the design to make them consistent and connected.


AFR Canvas Graphics

The next part of this project was creating canvas graphics. Originally the canvas banner and dashboard had MLK in the center. But the professor preferred to replace the image with the pioneer woman. In addition, we wanted to change the graphic to a lighter shade of red.


These are the final results of the canvas graphics with the callout buttons.


Overall, this was an exciting project to work on. I learn so many different applications for photoshop and I was able to create some visually appealing designs for the professor.

Filed Under: 2021 Spring - 2021 Summer, We are STAs

  • « Previous Page
  • 1
  • …
  • 36
  • 37
  • 38
  • 39
  • Next Page »

link to LAITS home page

Video STA Home

© 2025 Liberal Arts Instructional Technology Services | Production Credits