• We are STAs
    • Asha Rountree
    • Haley Ma
    • Kate Shih
    • Kyra Lee
    • Nicholas Peasley
    • Sasha Kenney
    • Shanda Horm
    • Shriya Atreya
    • Tomas Marulanda-Mesa
  • We were STAs
  • STA Presentation
    • STA Presentation 2017
    • STA Presentation 2016
  • Testimonials
  • Resources
  • Home

STA Blog

Daniela Caballero

Week 3

January 28, 2023 By Daniela Caballero

Week 3

Web Accessibility Standards


Started on: January 23, 2023

Completed on: January 26, 2023

STA Guidance: Valerie Tran

Description: Web Accessibility Standards


This week I completed a training on web accessibility standards. This training helped me learn the basics of how to design websites and create graphics to be more accessible to users. Three of the main concepts I gathered where that 1) text on a background picture or color needs to have enough contrast for the user to be able to see it. 2) Text and elements of an info graphic/webpage also have to be large enough for the user to see them and lastly, 3) Web pages must have a clear HTML hierarchy (this means usage of headers when the developer wants to highlight a main point) since component files of a the page might be used with other applications (such as text-to-speech) to provide accessibility. If the correct elements are not used, then the text-to-speech process might be inaccurate.


Part I: Infographics

The first part of this training involved an assignment in which I had to find two graphics online and tweak them to be more accessible to users. The first graphic I found was an infographic about mRNA vaccination. I used a tool that checks the contrast between a text color and a background color to identify that the contrast was very low on this graphic. I made some adjustments to the improve the contrast on Figma. First, I lightened the background and then darkened the color of all the text until the Coolors tools approved the contrast level. I was still have issues seeing the text so I also increased the font size and adjusted some of the pictures on the graphic. In order to do this I cut out sections of the images on I wanted to re-size, saved them as PNGs, placed a rectangle of the same color of the graphic to cover the image and then pasted the re-sized PNGs of it onto the rectangle.


Infographic 1 (original)infographic_1_original

Infographic 1 (edited)
infographic_1_edited


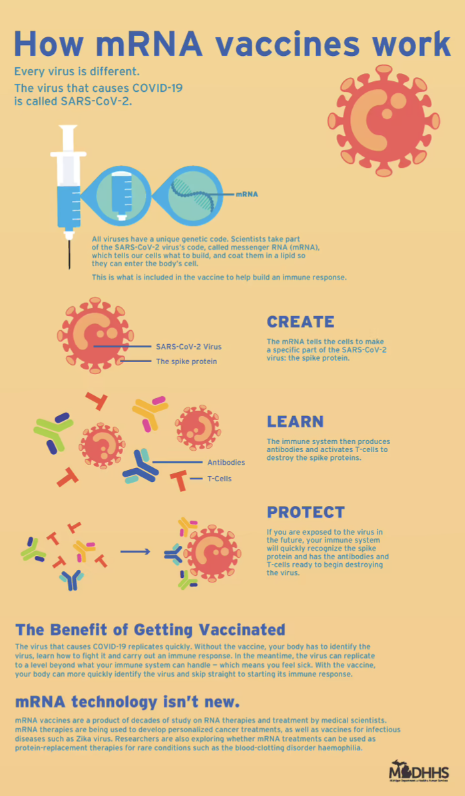
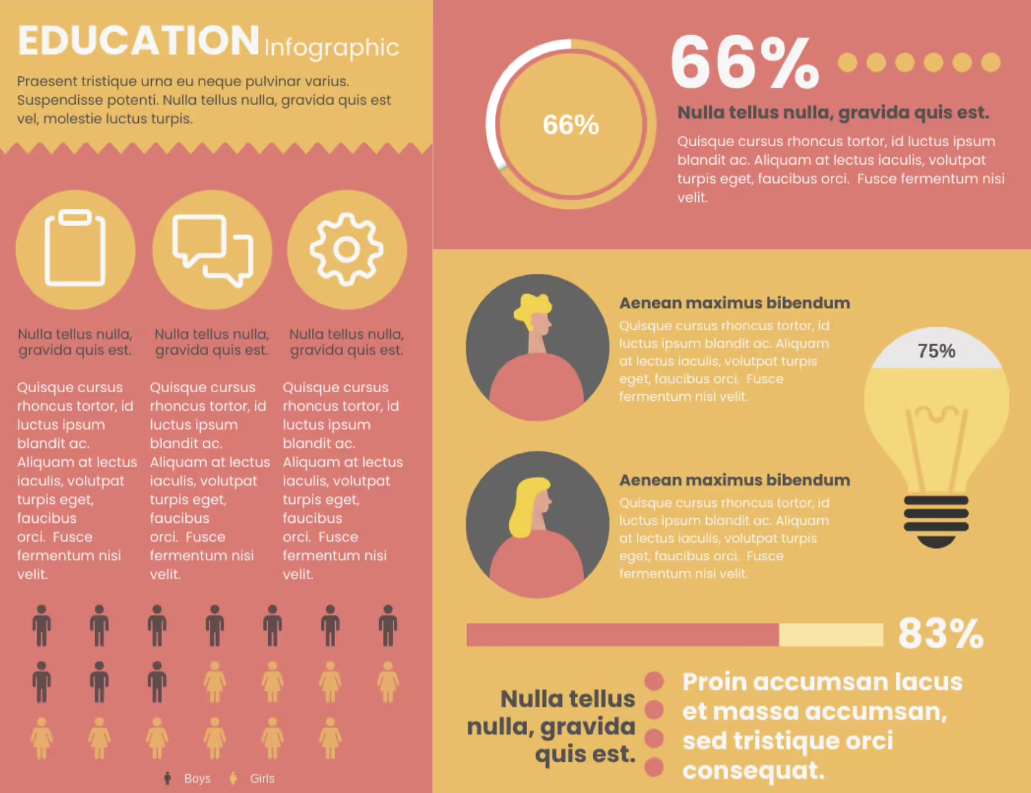
For the second infographic, I followed a similar process of identifying where the contrast failed to meet accessibility standards and adjusted in on Figma. Editing this graphic was slightly more challenging since there were elements (the yellow circular icons) that were originally on a different color background. I learned how to use the tools to create and cut out sections on Figma and how to delete parts on Mac Photo Preview.


Infographic 2 (original)

Infographic 2 (edited)


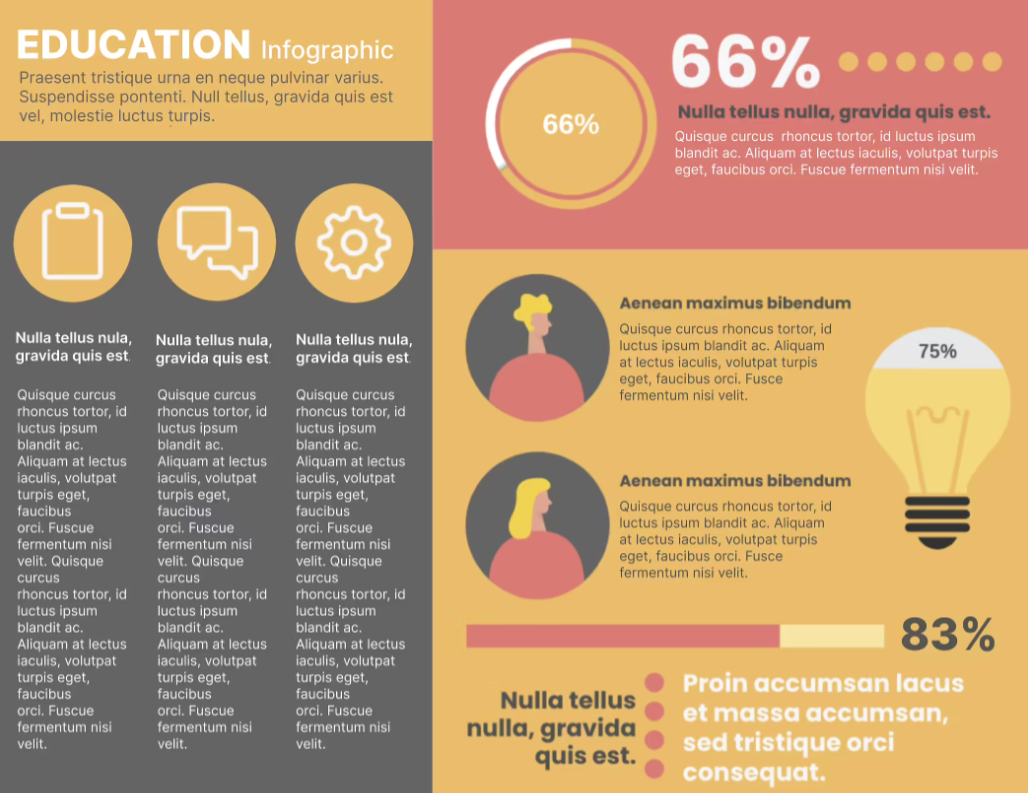
Intro to Websites PowerPoint


Started on: January 26, 2023

Completed on: January 27, 2023

STA Guidance: Valerie Tran

Description: Introduction to Websites


I created a PowerPoint after reading the LAITS Knowledge Base page about websites.

https://docs.google.com/presentation/d/12uCghpWPpzUcXcXhROjw6tTLO0SKP9itR1-mT0BvUh0/edit?usp=sharing

Filed Under: Fall 2022 - Spring 2023, We are STAs

Week 2

January 20, 2023 By Daniela Caballero

Week 2

Training: HTML/CSS Basic Training


Started on: January 17, 2023

Completed on: January 19, 2023

STA Guidance: Thang Truong

Description: In this training I learned the basics of HTML/CSS. HTML (Hyper Text Markup Language) is responsible for all the text we see on websites and CSS (Cascading Style Sheets) is used to add style and color. To freshen up my skills with CSS and HTML I did a training that required me to create a single-page website including three rules from the STA handbook.


HTML: Starting off with HTML, there are two general components to a website layout written in HTML. These are the head and the body. The head includes metadata about the page and the body is where all the text and element actually seen on the page are added. In HTML, the best way to separate different elements is by using a <div> or a container for other div types, headers, paragraphs, images, etc. I was able to center the header and STA rules in the center of the page by placing them all in the same div.


CSS: Working with CSS was definitely my favorite part of this training since there are so many properties to work with and ways to style a webpage. In order add CSS style properties to the elements and text found in an HTML, a class or id type must be added to the HTML element it order to reference it in the CSS file. All the white boxes (divs) about the rules on the page I created are tagged with the class “rule”.  In the CSS I referenced the “rule” class (this is also called using a selector!) and added the properties such as the font type, size, color and space to style it as seen below. Another thing about CSS is that it can used to dynamically change the sizing of some elements! By using percentages instead of fixed values for the width and height of divs, the text and images will increase and decrease in size proportionally to the browser window.


Link to the page

Filed Under: Fall 2022 - Spring 2023, We are STAs

Week 1

January 13, 2023 By Daniela Caballero

Intro

Hi! My name is Daniela, I’m a sophomore in Electrical and Computer Engineering and this was my first week as an STA! It was nice to meet the current staff and STAs. I spent most of the week being onboarded to the team and learning how to use all the project management tools/software here at LAITS. I am excited to begin working on more projects in the following weeks! Thank you LAITS team for welcoming me.

STA Banner and Avatar

Project: Blog Banner and Avatar

Client/Prof: LAITS STA Blog

Completion status: Started on 1/11

Description/plans: I designed my banner and avatar for the LAITS website

Timeline: 1/11-1/12

To be completed: Completed on 1/12


During the latter half of my first week, I completed my STA blog banner and avatar. I designed my banner and adjusted the dimensions on Canva which I had already used before for designing flyers for student orgs. To draw my avatar, I dabbled with Procreate for the first time so that I could export my design as a PNG with a transparent background.


avatar


Filed Under: Fall 2022 - Spring 2023, We are STAs

First Blog Post :-)

January 9, 2023 By Daniela Caballero

Hi Daniela! 🙂 Welcome to the STA Blog! This the page where your blog posts will published.
Toward the end of your STA Orientation, you’ll design and upload a banner to go at the top of this page.

Upload a Blog Banner


Step One: Design Your Banner in Photoshop

Use these Photoshop specs when you’re making your banner:

  • Your banner should be 780 pixels wide (the height doesn’t matter)
    • Must include your name, your major, and your expected graduation year
    • Your banner should reflect who you are (your personality, interests or major)
    • Make sure to save your banner for the web (i.e. File > Export > Save for Web (Legacy))
    • If you save your banner as a JPG, make sure sure the quality is high (i.e. at least 60)

Step Two: Save Your Banner

  • There are two places you can save your completed projects: UT Box and the LAITS server. You’ll be given a personal folder in both locations. For now, you only have to save your banner to UT Box, but you may have to access the server at some point in the future.

Accessing UT Box

  • If you haven’t already registered with Duo,  follow the instructions here to set up an account.
    • Then log in to UT Box with your EID and password: http://utexas.box.com/
    • Go to the folder called Design-Coding-STAs, then the subfolder STA-folders
    • Find the folder with your name on it
    • Save your banner both as an image and an unmerged PSD

Accessing the LAITS server

  • Accessing the LAITS server from off-campus is slightly more complicated.
    • You’ll need to be registered with Duo if you aren’t already (you can register here).
    • Then you’ll need to connect to the UT VPN and the LAITS server. The videos below will walk you through how to do that:
      • Connect to the Server – PC
      • Connect to the Server – Mac
    •  Then navigate to your STA volume folder and save
      • smb://file.laits.utexas.edu/sta/Adrian McKee
    • Save your banner both as an image and an unmerged PSD

Step Three: Upload Your Banner to the STA Blog

  • Log in the the STA Blog here.  You should’ve received an email confirming your new WordPress account with your username and assigned password. If didn’t get it or you can’t log in, ask Suloni or another STA.
  • You’ll be able to change your password anytime by going to Users > Your Profile > Account Management > New Password.

Uploading media and banners in WP

  • Read these links before you upload your banner.
  • They will walk you through how to upload media to your blog.

How to Upload a Homepage Banner

Adding New Posts and Media

Filed Under: Fall 2022 - Spring 2023

  • « Previous Page
  • 1
  • 2
  • 3

link to LAITS home page

Video STA Home

© 2025 Liberal Arts Instructional Technology Services | Production Credits