• We are STAs
    • Diya Nair
    • Haley Ma
    • Kate Shih
    • Kyra Lee
    • Leilani Cabello
    • Lila Mali
    • Marissa Devivar
    • Nicholas Peasley
    • Raaga Srimadh
    • Shanda Horm
    • Shriya Atreya
    • Thang Truong
  • We were STAs
  • STA Presentation
    • STA Presentation 2017
    • STA Presentation 2016
  • Testimonials
  • Resources
  • Home

STA Blog

Diya Nair

Diya Nair

STA Program… Till We Meet Again

September 4, 2024 By Diya Nair

STA Program… Till We Meet Again

This semester, I will be taking a break from my role as an STA. I have had such a wonderful time being a part of the STA Program in my freshman year. In the fall semester, I worked in the Surplus department where I managed and wiped information computer assets before they were handed over to UT Surplus.

In the Spring semester, I joined the Design Lab and worked on so many interesting projects. I first worked on migrating all digital assets in the Kiowa Calendar Project (https://kiowacalendars.org/) to Github Large File Storage from a 3rd party file storage solution. My second project, The Texas Politics Project (https://texaspolitics.utexas.edu/), involved simplifying the code and transferring the project from a previous web framework (grav) to a new framework (custom).

I look forward to returning as an STA. I loved working for this team. Working with both my managers – Stacy & De’sha has been amazing. I will miss their guidance and support as mentors from Day One. Shoutout to the both of them for serving as excellent resources and running the STA program so smoothly. I will also miss working with my fellow STAs 🙁

With that said, I am only taking a break from the STA program and I’m looking forward to focusing on school & being a TA! STA Program, till me meet again.

Filed Under: Fall 2023 - Spring 2024, We are STAs

My Summer

August 28, 2024 By Diya Nair

It’s finally back-to-school season, and the “How was your summer question” is at its peak on campus. This is the part where I say. “If I had a dollar for everytime someone has asked me about my summer…”, but I am not going there.

So, I have a prepared line that summarizes my summer in 5 words, India, Singapore, Internship, singing lessons, and yoga.

I visited my grandmother and my extended family in India. There was good food, beautiful scenery, and great conversations. I was also able to meet my friends in Singapore when I had a 1 day lay-over in the journey from The US to India. Reconnecting with my friends and learning more about their experiences in college was such a joy.

After returning to Texas from my trip, I interned at a Fiber Glass Manufacturing company. I was able to learn so much about the Electrical Engineering side of manufacturing. I used specialized software like AutoCAD Electrical to update existing drawings of the system and digitize drawings. As an engineering intern, I learned a great deal about design. And design affects every facet of your job. The design of your machine, the safety considerations and mechanisms, the accessibility of your design, the functionality of your machine. As I sit here writing my summer reflection, I can’t help but think that design is such an instrumental part of our life, and an important part of my job as an STA at UT Austin! As I design websites, I think about the accessibility of the website (thank you past STA’s for your training), the functionality of the website, and of course how secure is a website. These are considerations that govern how we make choices. What I learned from my engineering internship is that, design thinking is applicable everywhere –– from engineering to web-design to even our life.

Filed Under: Uncategorized

Project 0: The Kiowa Calendar Project

March 20, 2024 By Diya Nair

Project 0: The Kiowa Calendar Project

Project Started On: February 9th, 2024
Project Wrapped Up On: March 8th, 2024
Staff Guidance: Stacy
Link to Website: https://kiowacalendars.org/


Skills learnt: Github Large File Storage, Storage of assets on server, Using the Terminal beyond cd, mkdir, and pwd, .gitignore in github, a minor css fix, downloading thousands of images with 1 command, utilizing local servers (MAMP)

Introduction

The Kiowa Calendar Project aims to educate the public of the Kiowa Indians visual accounts of their history. The website collects and organizes entries from 15 Kiowa calendars that are currently held at museums. The website hosts about 3000 calendar images that were previously hosted on a 3rd party image hosting service.

Project Purpose: In order to eliminate dependency on 3rd party servers, LAITS decided to migrate all the 3000 images to a local server like GitHub Large File Storage.

 The Process: 3 main steps
When I started working on this project, I felt like I had to climb a tall mountain. However, looking back, each stage was equally exciting and challenging. These were the 3 processes involved in this project:

The Project Process had me asking these questions:
Q. How do I download Images who’s links are specified in a text file?
Q. How do I write a script that alters the location of the image in the csv file?
Q. How do I test the website to see if it has been deployed successfully?


1. Downloading all images using their links on the KiowaCalendar Website
– I was provided with a CSV file that contained all of the links to currently existing images on the website.
– I pulled the link section of the CSV file and converted it to a TXT file
– Now, manually downloading the images would have been extremely tedious and time consuming.
– So, after an hour’s research and Stacy’s guidance, I found that a single command in your terminal will help you download as many files you want to your local device as long as the links are in a .txt file.


                                        wget -i filename.txt  -O 

 Terminal window command to implement step


2. Writing Code that would append the CSV file to point to your local server
– Creating a git branch is important
– Earlier, the CSV file had a list of hyperlinks that was hosted on the 3rd party server.
– Since we are migrating it to a local server, we would want to change the path of where these files were stored.
– I utilized a python script to change the path of the files.


3. Deployment
– In this stage, we pushed all the changes we made into the github repository and merged it with the main branch


4. Testing & Debugging
– A day after the website was deployed, I found some bugs in the website. Some images were broken and there was a CSS styling issue which took away from the user experience.
– Over the last leg of this project journey, I worked on procuring the missing images and adding them to our image folder and fixing the CSS styling issue. It was one line of code!!!


Overall, this project was extremely insightful in helping me understand the various parts of the software development cycle! I’ve learned so much about standard practices in industry, utilizing git branches to work on different versions of the project, testing & debugging your code! I am also very grateful that the first project I worked on was being deployed live.
Filed Under: Fall 2023 - Spring 2024, Uncategorized, We are STAs

Week 2 & 3 & 4

February 14, 2024 By Diya Nair

Week 1 & 2 & 3 & 4 Recap:

Week 1&2 of my STA Journey:

  • I Became familiar with various tools used in day-to-day work.
  • Created a personalized banner for the blog
  • Started assigned training modules.
  • Completed my Web Accessibility Standards Training
  • Discovered the significance of building accessible websites.
  • Realized the importance of inclusivity and providing alternate formats of information.
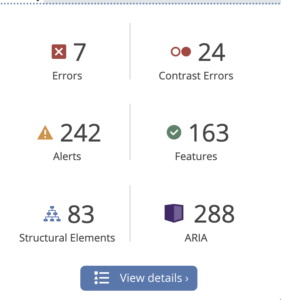
  • Learned about Web Accessibility Evaluation Tools, such as Wave, for analyzing websites for compliance with accessibility laws.
  • Utilized Figma to correct errors flagged by wave accessibility tools.

Wave Accessibility tool Logo

Wave Accessibility Tool 

Errors detected by Wave Evaluation Tool

Errors detected when I analyzed Byjus.com

In Week 3&4 of my STA Journey:

I built my first website using WordPress. The website taught beginners to use WordPress. Let me walk you through the various phases here!


Phase 0) Brainstorming

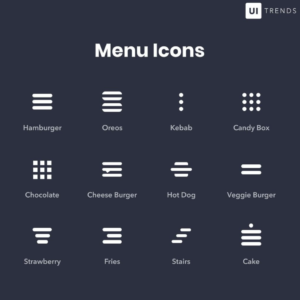
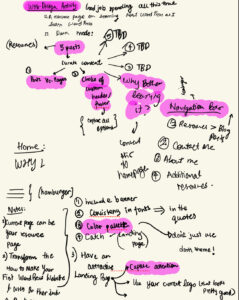
Before building my website, I drew a rough sketch on my notes app. At this point I asked De’sha for feedback regarding my rough plan and learned more about menu icons in the realm of website. As a digital native, I am sure we must have come across the menu bar  (three horizontal lines stacked on top of each other). I learned that the menu bar was called a hamburger and there’s a whole suite of names for the different icons used in WebDesign. I found this information really interesting and wanted to share it with the readers of the blog!

List of Names for Menu Icons in Web-Design

Menu Icons


My Brainstorm Process

BrainStorm Process 

Phase 1) Implementation

While no one likes to face problems, I believe that the best way to learn is through consistently failing. Here, I will list all of my mistakes and what I learned from them.


  1. Implementation is hard but doable if you persevere. Initially, I had no idea what themes were and I kept switching out themes to build my project. This created a couple issues because I was not able to locally customize certain things as the local customization did’t have precedence over the pre-built theme customization. It was mid-project that I learned from a colleague that Astra is really powerful theme for customization purposes, so I stuck to that. Lesson: Don’t keep changing themes in WordPress
  2. The global customization theme is your BestFriend! Starting off, I was unsure of utilizing global headers and global footers so I would spend a lot of time, individually customizing my global headers and footer for each page. The main problems with this implementation was 1) The headers and footers were not consistent across the pages and 2) A lot of time had to be spent in making these features consistent across pages.  Lesson: Master Global features.
  3. Another issue I had was implementing the menu bars. Before I built my website, I knew that I needed a navigation bar. So naturally, making that part work was very important to me. However, I was just not able to get the hamburger to show up. It was so frustrating. I watched Youtube Tutorials, spent a lot of time tinkering with WordPress only to conclude that perhaps Astra does not support Menu icons.  Lesson: Don’t axe your vision because it does not seem to work at first. 
  4. When in doubt, ask for help. This step is super important. After being frustrated at not being able to implement certain features, I asked for help from my Web-Dev supervisor. So we spent about an hour on a call where he explained how to go about implementing menu bars and sub-menus, thinking about Global features, overwriting of certain features, and increasing responsiveness of the website. Lesson: Try everything before you ask for help. That way you are prepared to learn the most. 


Phase 2) Feedback

I asked around for feedback. For me, this is one of the most exciting phases of building anything. I get a sense of what is working and what is not. I am also able to step out of my capacity as a creator of the project and criticize some of my own choices which pushes me to improve what I build.


  • Here’s a list some of the feedback I got:
  1. Improve your about me page.
  2. Have a banner for your landing page because it is the first thing people see and it is important to make it as catchy as possible.
  3. Have some sort of color palette.
  4. Keep your fonts consistent.
  5. Explore word hierarchy.
  6. Utilize horizontal scroll.


Phase 3) Repeat implementation

  • I incorporated different suggestions to make my website look attractive.
  • I decided to distinguish my website from other websites by turning the highlighted portion green.
  • I also made a menu with sub-menu and rounded the edges of them to make it more inviting for learners.
  • I was not able to explore utilizing horizontal scroll, but I will keep that in mind to implement in future websites.
  • I was able to build a uniform header and footer for my website.
  • I also implemented features that improved the responsiveness of the website.


Final Product! 

& drum-roll! I have been talking about my project through the entire blog without showing you my final product. So, here’s my first ever website! Enjoy 🙂

Link to Website


Filed Under: Fall 2023 - Spring 2024, Uncategorized, We are STAs

A Glimpse into My First Week as a Student Technology Assistant at LAITS

February 1, 2024 By Diya Nair

A Glimpse into My First Week as a Student Technology Assistant at LAITS


My first week at LAITS was fantastic! Spending time in the Development Studio reinforced a clear understanding: systems are the core of a successful team. I appreciate how we seamlessly integrate various applications, ensuring maximum productivity in my role as a Student Technology Assistant (STA).

A typical STA day involves logging into essential applications like Slack for communication, BaseCamp for task assignments, and Harvest for time tracking and progress monitoring. Crafting an intentional plan for each shift, even in shorter two-hour periods, significantly boosts my productivity. Juggling school and work can be challenging, but this simple practice of answering three questions before each shift equips me with the tools to smoothly switch from school to work:

A) What did you do yesterday?
B) What are your tasks for today?
C) Are there any impediments preventing you from completing your work? If not, indicate no impediments.

This reflective exercise empowers me to execute our daily plan efficiently.

A significant aspect of being an STA involves adapting to the organization’s project management tools. These applications, such as Slack for communication, BaseCamp for task assignments, and Harvest for time tracking and progress monitoring, play a crucial role in our daily workflow. Becoming proficient in navigating these platforms efficiently was a key focus during my first week in this role. Following that I started on my training modules, which I will talk about in my next post.


Images of the three applications we use as STA's. From left to right, Slack, Harvest, and Basecamp The complete suite of applications every Design STA is familiar with


Filed Under: Fall 2023 - Spring 2024, We are STAs

Welcome to the STA Blog

January 12, 2024 By Diya Nair

Hi Diya! Welcome to the STA Blog! This the page where your blog posts will published.

Toward the end of your STA Orientation, you’ll design and upload a banner to go at the top of this page.

Upload a Blog Banner


Step One: Design Your Banner in Photoshop

Use these Photoshop specs when you’re making your banner:

    • Your banner should be 780 pixels wide (the height doesn’t matter)
    • Must include your name, your major, and your expected graduation year
    • Your banner should reflect who you are (your personality, interests or major)
    • Make sure to save your banner for the web (i.e. File > Export > Save for Web (Legacy))
    • If you save your banner as a JPG, make sure sure the quality is high (i.e. at least 60)

Step Two: Save Your Banner

  • There are two places you can save your completed projects: UT Box and the LAITS server. You’ll be given a personal folder in both locations. For now, you only have to save your banner to UT Box, but you may have to access the server at some point in the future.

Accessing UT Box

    • If you haven’t already registered with Duo, follow the instructions here to set up an account.
    • Then log in to UT Box with your EID and password: http://utexas.box.com/
    • Go to the folder called Design-Coding-STAs, then the subfolder STA-folders
    • Find the folder with your name on it
    • Save your banner both as an image and an unmerged PSD

Accessing the LAITS server

    • Accessing the LAITS server from off-campus is slightly more complicated.
    • You’ll need to be registered with Duo if you aren’t already (you can register here).
    • Then you’ll need to connect to the UT VPN and the LAITS server. The videos below will walk you through how to do that:
      • Connect to the Server – PC
      • Connect to the Server – Mac
    •  Then navigate to your STA volume folder and save
      • smb://file.laits.utexas.edu/sta/Diya Nair
    • Save your banner both as an image and an unmerged PSD

Step Three: Upload Your Banner to the STA Blog

  • Log in the the STA Blog here. You should’ve received an email confirming your new WordPress account with your username and assigned password. If didn’t get it or you can’t log in, ask De’sha or another STA.
  • You’ll be able to change your password anytime by going to Users > Your Profile > Account Management > New Password.

Uploading media and banners in WP

  • Read these links before you upload your banner.
  • They will walk you through how to upload media to your blog.

How to Upload a Homepage Banner

Adding New Posts and Media

Make Your First Blog post


  • Reflect on the day. You blog posts will be a documented experience of your time as an STA with LAITS. They can include anything you want to share about the projects you’re working on, and the more media (screenshots, images, links, videos, gifs) you can use, the better.
  • For today, write a bit about about yourself and what you did during orientation.
  • If you haven’t already, upload your banner.

Things to Remember


Image Specs

  • You should never copy and paste images intoto your blog. Always upload images into the media section of blog first (Click on the add media button), then insert the image from the media folder to display on your blog.
  • Don’t use the thumbnail version of your images.
  • Use images that are 72 dpi
  • Screenshots are fine
  • Images that are 780 pix wide format nicely above or below text blocks

Always Categorize Your Posts

  • Always check the category “Fall 2023 – Spring 2024” on the blog posts you make this summer. This is the only category you need to check.
  • Make sure your posts are categorized correctly so that all of your work is documented in the correct semesters.

Commenting on Basecamp

Notification comments: etiquette, files, questions, feedback

Let us know when you’ve completed this task by adding a link to your blog to a comment in Basecamp.
Notes for all comments in Basecamp:
  • *Always address the person/people you are writing to by their names.
  • *Always use complete sentences.
  • *Always add links or paths to your design file in your STA folder.
  • *Make it easier for your collaborators and mentors to give you feedback on a design by adding screenshots to your comment.


Notify people in Basecamp by adding the @ symbol before their names (no spaces), otherwise they may not see your comment.

@ your STA mentor in your comments when you want to:

  • ask us questions about the mechanics of using the STA blog,
  • about the mechanics of photoshop,
  • to let us know that you have completed this task,
  • or that you would like a little feedback on on your banner design

Thank you & have fun!

Filed Under: Fall 2023 - Spring 2024

link to LAITS home page

Video STA Home

© 2025 Liberal Arts Instructional Technology Services | Production Credits