Standards for Processing Scanned Images
So you’re hanging out in the office, getting some work done, when suddenly a professor shows up that wants some scanning done. What do you do? If you are not quite sure what to do, then fear not! What follows is a comprehensive document detailing the scanning process (including Flatbed and Slide Scans).
1. Flatbed Scanning
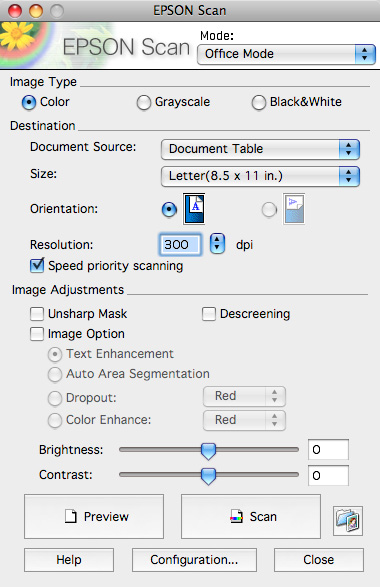
- a. Turn scanner on (find that power button and push it) and open the scan program: EPSON Scan. Lift the top of the scanner and place item to be scanned face down on the glass (check out the arrow in the top right corner). Close the top of the scanner (please remove hand/face/hiney before closing).
- b. There are a few different Mode options. For flatbed scanning, Office Mode seems to be the best.
- c. Depending on what is being scanned, you may want to choose b/n Image Types. Most will be done as Color. However, if you are scanning something like a newspaper clipping, Grayscale might be a better choice. For a page of text from a book or simple pen and ink drawings, Black & White might be preferable. You can always change the mode after previewing the image and it will show you the difference.
- d. Check to make sure the size, orientation, and resolution are set appropriately:For images largerthan postcard size, scan at 300 dpi.For images that are postcard size or smaller, scan at 600dpi.For many small images on a large page, scan the whole page in at 600 dpi.
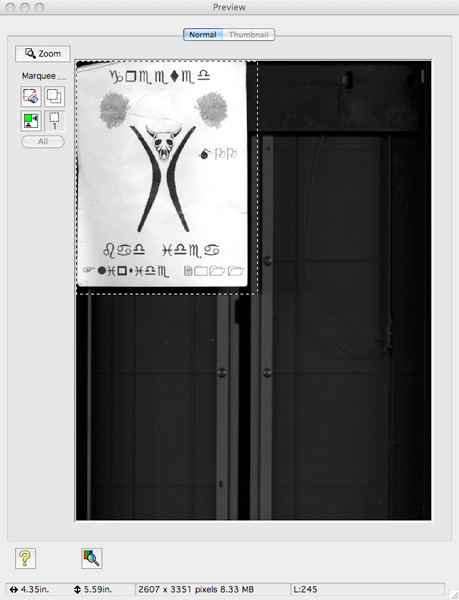
- e. Press the Preview button and wait for the window to appear with a preview of the scanned image. The scanner may need a moment or two to get warmed up. Please wait…
- f. Now you will need to draw a marquee around the image you want scanned. You can either click and drag the marquee manually (and adjust borders as needed), or you can click the bottom left Marquee button (look for the little green square), which will attempt to automatically locate and select the image (you can adjust borders as needed).
- g. Next you need to set up a folder, where the images will be saved. Create a folder on the desktop (call it “scans” or use the professor or project name or something).
- h.Now return to the original scan window and find the Scan button towards the bottom. Don’t press it yet!There is a smaller button (File Save Settings) to the right of the Scan button. Press that one first. When the File Save Settings window opens you are going to specify the Location of where you want the images to be saved. Hit the Choose… button and find the folder you made for the project.
- i. Next you will want to specify how the files will be named. Choose some prefix (maybe the professor’s name) and set the start number to 001. The system will automatically increase the number each time you scan something new. So if you are continuing a scanning project (rather than starting a whole new one), simply check the file save settings to make sure nobody has changed the destination or file names. See below for tips on file Naming Conventions.
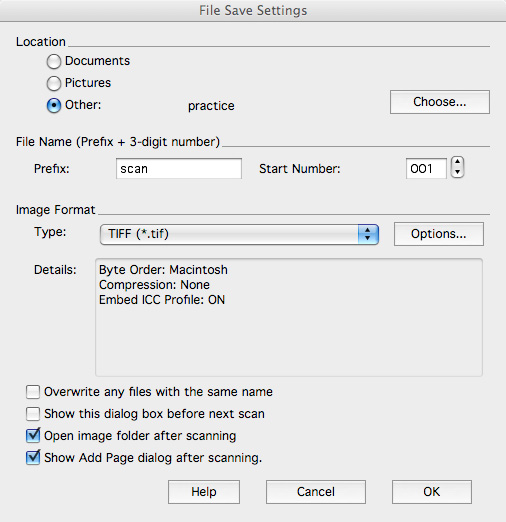
- j. Return to the original Scan Window. You may now press that Scan button. Sit back and relax for a few seconds while it does its thing. When completed, the folder you created will open and you can see the image file has been scanned and saved.
- k. Congratulations, you did it! Give yourself a nice pat on the back. Now…ready to do it all again?
- l. Lather, Rinse, Repeat (as needed).
2. Slide Scanning
- a. Turn scanner and scanning program (EPSON Scan) on.
- b. Remove white foam insert located on the lid facing the scanner glass.
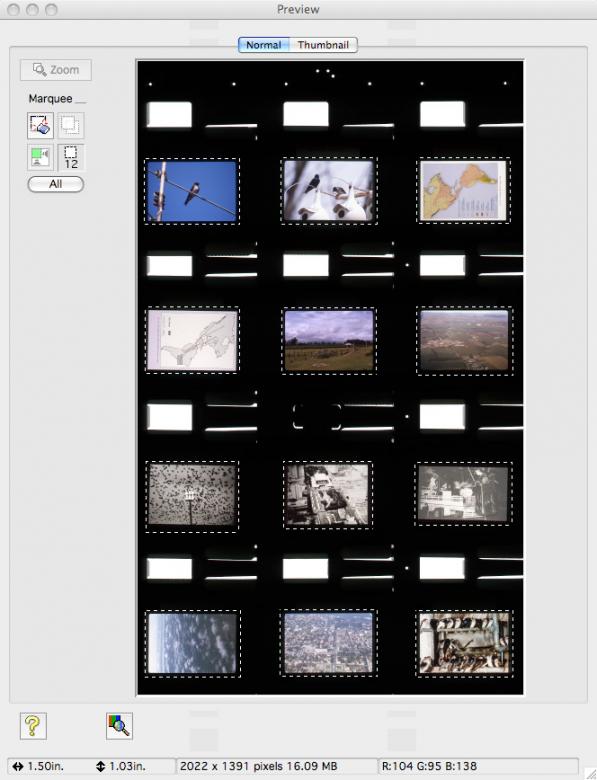
- c. Locate the 12-Slide Tray. Load 12-Slide Tray with slides facing down (follow diagrams on tray). Note that the scanner scans slides from top right to left, then down to the next row from right to left, and so on.Keeping this in mind, make sure to load the slides appropriately. Place tray face down (slide fronts facing glass) on the scanner bed, with tray pegs on the right within appropriate holes (follow the arrows). Close top of scanner.Some professors may request manual slide cleaning before scanning. To clean slides, use the Anti-Stat Slide Cleaner on a cotton square and gently clean the surface of both sides of the slide. Be careful not to scratch the slide.
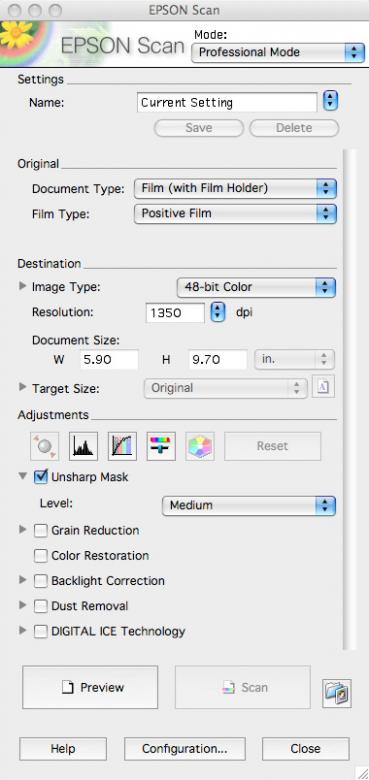
- d. In the EPSON Scan window, change Mode to Professional Mode. Set Document Type to Film (with Film Holder) and Film Type to Positive Film. Image Type should be set to 48-bit Color. The Resolution for slide scanning should be set to 1350 dpi. Check Color Restoration then click the Preview button.
- e. Once the Preview window opens, switch from Thumbnail view to Normal view. Now you will need to draw a marquee box around each image to be scanned. Click and drag boxes manually. Once they all have boxes around them, click the All button. The images are now ready to be scanned.
- f.Now return to the original scan window and find the Scan button towards the bottom. Don’t press it yet!There is a smaller button (File Save Settings) to the right of the Scan button. Press that one first. When the File Save Settings window opens you are going to specify the Location of where you want the images to be saved. Hit the Choose… button and find the folder you made for the project.
- j. Next you will want to specify how the files will be named. Choose some prefix (maybe the professor’s name) and set the start number to 001. The system will automatically increase the number each time you scan something new. So if you are continuing a scanning project (rather than starting a whole new one), simply check the file save settings to make sure nobody has changed the destination or file names. See below for tips on file Naming Conventions.
- k. Return to the original Scan Window. You may now press that Scan button. Sit back and relax for a few seconds while it does its thing. When completed, the folder you created will open and you can see the image files have been scanned and saved.
- l. And that, as they say, is that. After scanning, make sure to return the slides back to their original place (within the carousel, or binder, or container) from whence they came.
- m. Lather, Rinse, Repeat (as needed).
3. Saving Images, Naming Conventions, Backing Work Up
- a. There is no definitive rule of how to name saved image files. Sometimes professors have very specific directions as to how they would like the images saved. Other times the professor will have no opinion either way. Thus your naming conventions between different scanning projects may vary. Make sure your naming conventions for each image in a set are consistent, though. This will keep the images well organized.
- i.e. flower_001.tif, flower_002.tif, flower_003.tif, flower_004.tif, etc.
- b. RAW images should be saved at their scanned resolution as TIFFS, using NO image compression. We usually save them for MAC.
- c. For Powerpoint, save images as JPEGS at 72 dpi, with the height being no greater than 600 pixels and the width being no greater than 800. These will be placed on a 1024 by 768 background.
- d. Please make a backup cd OF ALL IMAGES and Pwrpt presentations for our departmental archive.
- e. At the end of your shift, after scanning images, before shutting down and clocking out, make sure to move your scans folder from the desktop to your folder in the STA Server. That way, if anybody comes around to clean the desktop, your progress will not be lost (which can be extremely frustrating).
- f. After scanning all of the images for any project, you will then open the image files in photoshop, crop and color-correct them (if the professor requests color-corrections) and burn them to a CD or DVD.
- g. After burning all scanned images to a CD or DVD, email the professor and let them know that you are done and their stuff is ready to be picked up in the lab.
Notes:
Nikon scanners can scan about 20 slides an hour due to one at a time loading and frequent software crashes.
EPSON scanner takes about 18 minutes to scan 12 slides. During this time, no user attention is needed. After scanning, user must manually set the scan region of each of the next 12 slides and then load a new batch. Caution: EPSON Scanner does not scan slides in order you must manually label the files as you take the slide out of the holder.
Many slides have a very blue shade due to the old slides. When using the Nikon scanner, you can usually auto color correct and manual crop a scanned image while the next image is being scanned. With the EPSON scanner, multitasking is definitely possible during the 18 minute scanning (of 12 slides). For more detailed color correcting and image touch up, each image’s post scanning work can take between 5 to 45 minutes depending on how bad the colors are and how dirty the image is. DUST off the image before scanning!!!!
